

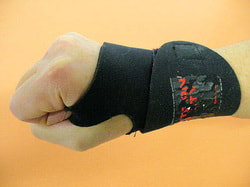
 WRIST SUPPORTS If you are like most t-shirt screen printers, you will most likely start off in the business using a manual printing press. Using a manual press, means literally “doing the printing by hand.” One drawback of manual printing is that using a squeegee is a repetitive task. With what is known today about carpal tunnel syndrome with regard to repetitive tasks, we highly recommends the use of wrist supports. Wrist supports (when worn properly) help protect against carpal tunnel syndrome without affecting the range of motion that is used when pulling a squeegee. Wrist supports should be worn on both wrists. They are inexpensive to purchase and are well worth the money. They are available from HarborFreight.com. 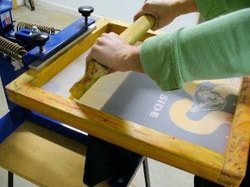 HOW TO HOLD THE SQUEEGEE While holding the squeegee properly should be intuitive, a few tips may still be in order, especially for those who have never used one. In our experience, the best way to hold a full size squeegee (10” to 16” sizes) is to place your hands approximately one inch in from each end of the squeegee. See photo. Holding the squeegee this way allows for a good balance for most print applications. When using smaller squeegees, you will not have that option. With smaller sized squeegees, place your hands in the most natural or comfortable way possible. THE “DEATH” GRIP To avoid premature hand fatigue with any squeegee, avoid gripping the squeegee with a “death grip.” Only use as much gripping power as necessary when printing. Gripping too tightly will become painfully obvious (literally) on long print runs and the best way to avoid that is to be mindful of your grip and “loosen-up” when necessary while printing. “COMFORT” GRIPS & “ERGO” SQUEEGEES You can purchase “comfort grips” that you place on your squeegees to make them more comfortable. One solution is “ergo” handle squeegees. See photo (the squeegees shown are “ergo handle” types.) 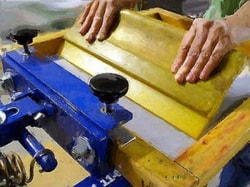 There are a number of techniques to becoming a good screen printer (especially if you use manual printing equipment) and knowing how to use a squeegee properly is foremost among them. In the this article, we will discuss various printing techniques and related subjects. 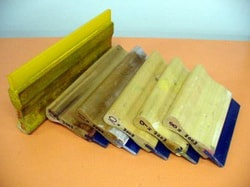 The handles are “ergonomically” shaped for user comfort. Once you have used an ergo handle squeegees you may become spoiled when having to use a conventional “tear drop” shaped handle. Ergo handles are available at some vendors and are highly recommended. FLOOD STROKE A flood stroke (coating the print area with ink) should be done at angle of around 20-30 degrees. The flood stroke is often used to “flood” large open print areas so the “print” stroke has an adequate “layer” of ink to produce a good print. As you can see the angle is considerably more “downward.” A typical use of the flood stroke is for printing large white underbase print where a single initial stroke will not spread the ink sufficiently across the screen. NORMAL STROKE For you math oriented folks, an angle of 45-60 degrees can be considered a “standard” angle to hold the squeegee for most print jobs. A little trick is to draw an imaginary line from your nose to the squeegee handle to simulate the 45 degree angle. Keeping this “line” pictured in your mind while printing will give you a point of reference for “angling” your squeegee properly. See photo at left of a "normal stroke angle." SQUEEGEE ANGLES The angle that you hold the squeegee during the stroking process is important. Remember this rule, the more that you “angle” the squeegee downward (assuming equal pressure in each stroke), the more ink that will be deposited on the substrate (and the darker or more opaque the print becomes.) As a manual screen printer, you want to become a “master” at how to use a squeegee. Below are the main types of “stroking” techniques for manual screen printing. COATING STROKE A stroke known as a “coating stroke” is around 20-30 degrees, like that of a flood stroke. The difference is that a “coating stroke” is applied with lighter pressure than a flood stroke. The coating stroke's purpose is to just “cover over” a 1st or 2nd stroke to achieve an acceptably opaque print on a dark shirt without having to flash cure. The mastery of an effective “coating” stroke takes some practice and will not work with all inks and every type of artwork or mesh count. HOW HARD SHOULD I PULL THE SQUEEGEE? A question often asked is how hard should I pull the squeegee? The rule of thumb is don't push down so hard as to cause the squeegee blade to bend. It does not take a huge amount of force to drive the ink through the stencil. Use as little force as is necessary. This will take some practice, but is well worth mastering not only to produce good prints but to reduce operator fatigue as well. HOW FAST DO I STROKE? If you can't pick up all of the excess ink at the end of the stroke, you are printing too fast. Printing too slow is not usually a problem, printing too fast typically is. HOW MANY STROKES? The short answer is–use as few as possible. Ideally, use only one stroke. But in the real world, that is usually not possible, particularly in the world of manual printing. If you are flash printing dark shirts, one stroke is not possible, nor is it possible for certain print jobs where flood stroking is necessary and where one stroke just doesn't produce an acceptable print. The rule to live by is dictated by the words above. Use as few print strokes as will produce an “acceptable” print. What is an “acceptable” print? A print that you are reasonably certain will not give the customer any reason to complain. In other words, would you buy that shirt yourself? If the answer is a truthful “yes,” you've passed the “acceptable print test.” Let's discuss some general rules of thumb for manual printing and “number of print strokes” in the “real world.” There are times when you must stroke two, even three times to get an acceptable print. The variables that are going to affect the stroking required for a given job are the mesh count, the type of ink, the image (fine detail and halftones), and lastly how tired you are. The last one is important, because unlike a automatic press, you will get tired and lose your strength. This is only natural. When you are tired, the only way to keep the prints looking consistent is print another stroke. While the ideal solution is to stop when you are tired, many times this is not possible as the job must be delivered on a deadline. The important thing to take from this is to keep in mind “your strength factor” when planning any large print jobs. If you are tired from printing a huge job just the day before, maybe now is the time to consider getting some help. Having an extra set of “arms” available to do some printing should not be considered a luxury but a necessity. While some “experts” may rigidly tell you to “always” print using just one stroke, the customer will complain vigorously over a noticeably “light” print. Remember your customer does not care if you use one stroke or four to achieve the results, they only want a good looking print. Regarding the other factors mentioned above, i.e.: mesh count, ink type, and type of image, if you take each of these elements into consideration when planning the print job, you should be able to avoid having to stroke more than necessary. Choose the right mesh count for the image, be sure to stir the ink thoroughly before printing and if necessary cut the ink down with curable ink reducer (available from your screen printing supplier) to make the ink easier to print.
0 Comments
Your comment will be posted after it is approved.
Leave a Reply. |
AuthorASPA Staff ArchivesCategories
All
|
 RSS Feed