

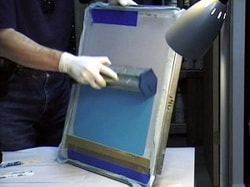
 Much of your time in the screen printing process will be devoted to screen making. This includes cleaning, washing out (after exposure), reclaiming and coating screens. You’ll need a dedicated area in your shop devoted to this process. In this article, we cover the important details you will need to know for preparing screens for the application of emulsion. 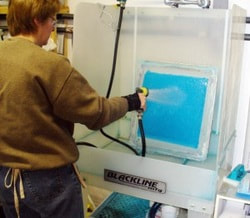 A DEDICATED WASHOUT SINK The ideal solution is to have a dedicated washout sink with hot and cold water faucets and a filtering system that can remove waste and other impurities from going down the drain. If you have a septic system, you may want to check with your local septic expert to see if the chemicals you will be sending down the drain could be harmful to your septic system. It’s important to have a mixture of hot and cold water, as you will need to use water that is tepid. 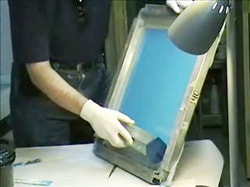 SHOULD I USE THE SHARP EDGE OR THE ROUNDED EDGE? Good question. This author's experience having coated thousands of screens, is to use the rounded edge for mesh counts of 60 up to 140 and the sharp edge for mesh counts of 162 and up. The reason for this is simple, most jobs involving fine detail and/or small halftone dots do not require a heavy ink deposit and you want to be able to wash out the image on the screen easily. The sharp edge deposits less emulsion on the screen resulting in a thin ink deposit on the printed product. THE COATING TECHNIQUE Fill the scoop coater about three quarters of the way full. If you overfill it, you will most likely spill emulsion, as it has a tendency to run off the sides if overfilled. It is also a good idea to do your screen coating on a table that is covered with old newspapers for an easy clean-up after you’re through. A cheap, fold-up card table works perfectly for the job. After you have the emulsion in your coater and starting on the print side (bottom of the screen), tilt the screen about 30 degrees. Place your scoop coater at the bottom of the screen, tilt the scoop coater enough to allow the emulsion to touch the screen and slowly pull the scoop coater until you come within an inch or two of the top of screen. Turn the screen upside down and do the same coating step again. Next, turn the screen over and repeat this step on the inside of the screen, but this time apply only one coat of emulsion. 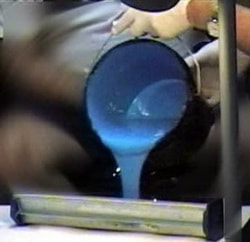 USING A “SCOOP COATER” It is imperative that you apply emulsion with a scoop coater. A “scoop coater” is a specially made, aluminum trough used to hold emulsion for spreading on the screen during the coating process. Trying to apply emulsion to a screen with a piece of cardboard or some other makeshift device will only result in a mess. Spend the few dollars to buy a scoop coater, it is a definite necessity. When purchasing a scoop coater, be sure to order one that at least 2 inches smaller than the short side of the inside dimensions of the screen. If the scoop coater is too big, you will have a tough time pulling it across the screen easily. The last detail about scoop coaters is take care of it. If you get nicks in the coating edge, you will have lines in the emulsion coating every time you coat your screens.  A VERY IMPORTANT FIRST STEP….CLEANING THE SCREEN Before we begin a discussion on how to coat a screen, we must first discuss one of the vital steps necessary prior to coating a screen. This first step is the proper cleaning of the screen. While we’re on the subject of screen cleaning, it is important to know that you’ll need an area in your shop (or in your home if you are a home-based printer) that has a dedicated area for you to clean, wash-out, and expose your screens. This is important because much of your time in the screen printing process will be devoted to the screen making process which includes cleaning, washing out (after exposure), reclaiming and coating screens. HOW TIMES SHOULD I COAT EACH SIDE? This is a topic where I am sure there will be some debate, but it is this authors experience as what has worked best: MESH COUNTS OF 60-140: Two coats on the print side, One coat on the inside of the screen using the rounded edge of the scoop coater. MESH COUNTS OF 162-305 (and up): One coat on the print side, one coat on the inside using the sharp edge of the scoop coater. These coating recommendations are based on printing plastisol ink on t-shirts and other apparel, detailed line art, halftones, and screens using solvent-based inks as well. The only controversy here is whether or not you should apply a second coat to the inside of screen. We have found that by eliminating the second inside coating, we are better able to wash out fine details with better results. Additionally, on the high mesh counts of 200-305 where small halftone dots are involved, you will find that a single coating on each side is all that is needed and that the image and dots will washout that much easier after exposure.  HOW TO APPLY EMULSION TO A SCREEN WORKING UNDER “SAFE” LIGHT Before you begin any screen coating session, you must work under “safe” lighting and yellow bug lights work perfectly. Because emulsion is photo-sensitive, you must not have any regular light present in the room as the emulsion will be exposed by that light and will not work properly. If you are in a room with windows and you coat your screens during the day, be sure to cover the windows to prevent light from entering and turn off all regular lighting in the room. 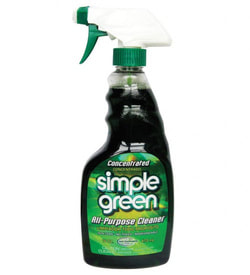 THE ACTUAL CLEANING Place the screen in the washout sink (many washout sinks are large enough that you can place more than one screen in the sink at a time and you will most likely want to do that once you get your personal cleaning “system” figured out.) First, thoroughly spray the screens with water so they’re completely wet. Next, using a degreasing cleaner like Mean Green or Simple Green, spray the screen with the degreasing agent. Using a scrub brush which you can get at any hardware store, scrub the screen vigorously. As a side note, you can also purchase specialized scrubbing brushes from your screen printing supply vendor that is made just for the purpose of scrubbing screens–and they work very well. Once it is apparent that the screen is completely clean, spray the screen off with water removing all traces of the degreaser. If you’re satisfied that the screen is clean, take care not to touch the fabric on the screen and place it in a rack for drying.
0 Comments
Your comment will be posted after it is approved.
Leave a Reply. |
AuthorASPA Staff ArchivesCategories
All
|
 RSS Feed