

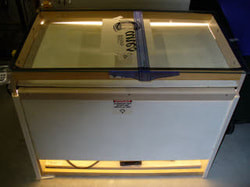
  Even if you are only slightly handy with some common household tools like a drill, a screwdriver and a saw, you will be able to build your own exposure unit. You do not have to be a skilled craftsman or have any advanced skills to build any of the units that are described in this article. Many new screen printers don’t have a unlimited budget when starting out, and building your own exposure unit is one way you can save money. For many, building a “home-made” unit is a source of pride and achievement. Another benefit of “doing it yourself” is that if anything ever breaks, you’ll know how to fix it, since you built if yourself. In this article (originally written in June 2014), we're going to present several types of homemade exposure units you can build. All are affordable and will do the job of burning screens nicely. 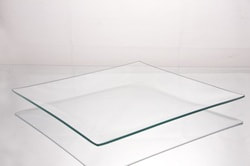 The “home-made” units covered in this chapter range in cost from under $100 (fluorescent tube or halogen bulb unit) to around $300 for a metal-halide unit. When purchasing the glass tops for any of these units, order ¼” thick, clear glass. Request glass that is free of any optical defects and advise the glass company that you are going to be using the glass for a photographic process and need the glass to be as perfect as possible. Ask that the corners of the glass be rounded (to avoid sharp edges when handling the glass when cleaning, bulb changing, etc.) and that the glass be polished for you. 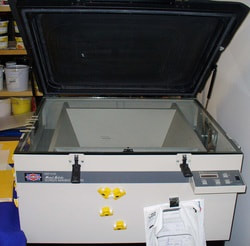 It’s important to point out that none of these home-made units utilize a vacuum system for screen hold-down (not necessary), do not have a light integrator (adds significant cost and complexity), nor are they recommended for exposing screens from artwork that contain fine halftone dots (due to the lack of a light integrator). Apart from that, these “home-made” units will work just as well (and possibly better and faster) than some commercial units and have parts (and bulbs) that are cheaper and easier to replace. For burning screens containing line art and large halftone dots (35 lpi and lower), these units will work very well. It is unlikely that you are going to be burning critical, fine dot halftone screens right away. But if that type of work is integral to your immediate plans, it is recommended that you purchase a high-end commercial unit with a light integration system. The point-light source “home-made” units covered in this tutorial work well as “workhorse” units because you can burn screens very fast, one after another. Even if you have the luxury of having a commercial unit and a “home-made” unit, you may find that your home-made unit will be used more often to accommodate the run of the mill artwork that you process daily. SOLUTIONS TO COMMON PROBLEMS WITH HOMEMADE EXPOSURE UNITS A question that comes up on a regular basis, is what type of light should I use for my "homemade" exposure unit? Here's an article that you will definitely want to read: What's the best type of light for an exposure unit? Another common problem is how to get a good, firm contact on the exposure glass of the film to the screen when burning a screens. There is a simple solution to that problem, check out: "How to Build a Screen Hold-down for an Exposure Unit."  EL CHEAPO “GROW” LIGHT UNIT This type of exposure unit is based on plans that you’ll see in many “how-to” screen printing books. It is easy and inexpensive to make, but it is less than ideal for screen making due to the lower quality light source and the time it takes to burn a screen. This is the type of exposure unit that this author built to start a screen printing business in the early nineties and it was used to burn hundreds of screens. Some 15 years later, it still works and no parts were ever replaced! Speaking of parts, this unit is pure simplicity. It consists of only a plywood box, (3) grow lights, an electrical strip (used as the “power switch”) and a glass top for placing a screen onto. At this writing, this unit can be built for around $85. The dimensions of this unit are 31” X 19” X 6” and will easily accommodate average sized screens for printing t-shirts of 20” X 22 or similar sizes. This low cost unit can be built using either fluorescent “grow” lights or halogen “grow” lights available at many department and home building supply stores. The downside of this unit is that neither of these two types of illumination (fluorescent or halogen) are ideal light sources and it will take about 7-10 minutes to burn a screen coated with photo emulsion. This unit has handles on the side and can be easily carried from one location to another. 400 WATT METAL HALIDE UNIT This unit was built and designed by the author and was used with great success for many years. Many thousands of screens were burned with this exposure unit and with the exception of replacing the metal halide bulb periodically and replacing the fan once, this unit was our shop’s “workhorse” exposure unit. Even though we had a high-end commercially made metal halide exposure unit with a light integration system in our shop, we used this “home-made” unit to do the lion’s share of our screen burning as it worked better and more efficiently. This unit will burn a screen in a minute or less. This is a shorter time than it takes the vacuum blanket on a typical commercial unit to make the contact seal against the exposure glass! We reserved the use of our high end commercially made exposure unit exclusively for the purpose of burning halftones and other very critical images. This design for this unit was derived in a somewhat unusual way. The idea for the “light reveal board” came from using a wooden computer desk and we cannibalized the rest of the desk parts to make the base structure. EDITOR'S NOTE: Metal halide and mercury vapor light fixtures are becoming difficult to obtain locally these days thanks to government regulations--but they are still available. The components of this unit are a 400 watt metal halide light fixture (available at any commercial lighting store), a fan used to cool the bulb during operation that just “sits” in the base of the unit, a digital count-down timer, an electrical strip (used as the “power switch”) the glass top, and of course the “light reveal board” that is “pulled out” to reveal the light when you are ready to burn the screen. The metal halide fixture used for this unit is typically used as a high intensity security light for outdoor installations available at most lighting stores. For this unit, you will need to attach a heavy 12 gauge electrical cord and plug so you can plug it into the electrical strip on the side of the unit. Both the electrical cord and plug are available at any hardware or home builder supplies store. At this writing, this unit can be built for under $300. Replacement bulbs are around $40 and you should replace the bulbs every two years or so, depending on how many screens you burn. When operating this unit, you will need to allow for a 10 minute warm-up for the metal halide bulb. Because of the intensity of the light, it is recommended that you open the “light reveal board” only when the unit is being used for burning screens. 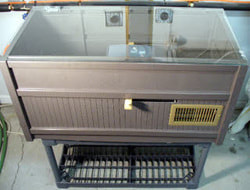 175 WATT MERCURY VAPOR UNIT This unit was built as an experiment, in an attempt to try to improve upon the 400W metal halide unit. Our test was a success. Mercury vapor bulbs of this size are less expensive than the metal halide equivalent and are more readily available. The plastic storage box in this unit was easy to adapt to this application and is relatively inexpensive. Although it takes slightly longer to burn a screen due to the lower wattage bulb, this unit is simpler to operate and the operating and purchase cost of the the 175 watt mercury vapor light is less than the 400 watt unit. It is also easier to build this unit as most of the parts are ready to implement right off the shelf. You can burn a screen coated with photo emulsion in under 2 minutes with this unit. The photos shown on the next page describe the key components of this exposure unit and how it is made. The components consists of a 175 watt mercury vapor light fixture and bulb, a plastic “bench style” storage box (available at Sears or other home supply store), a cooling fan, an electrical power strip, a glass top and special “light blocking tray” used to “shutter” the light when a screen is not being exposed. 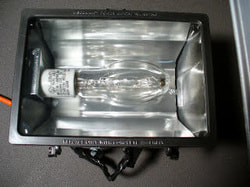 The light blocking tray consists of a large aluminum cooking tray (about $5 available at any dept. store) and a wooden handle that is used to slide across the inside of the unit to shutter the off and on for exposing. Apart from the operation of the “light blocking tray,” this unit operates exactly the same as the metal halide unit. The mercury vapor fixture used for this unit is typically used as a high intensity security light for outdoor installations. For this unit, you will need to attach a heavy 12 gauge electrical cord and plug so you can plug it into the electrical strip on the side of the unit. Both the electrical cord and plug are available at any hardware or home builder supplies store. 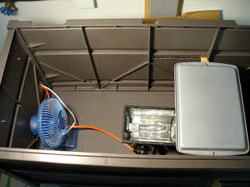 We also added (2) aluminum vents, one on the front and one on the side to allow heat to escape. After we added the vents, we discovered that heat is not much of an issue, so you may want to use one vent only. The vents available at most home building stores are sold as heat vents for mobile homes and they are inexpensive. For easier access, we placed this unit on top of an inexpensive, plastic shelving unit. This raises the operating height of the unit and allows for placing the screens on it at a convenient “standing” height. At this writing, this unit can be built for under $200. Replacement bulbs are around $12 and you should replace the bulbs every two years or so, depending on how many screens you burn. When operating this unit, you will need to allow for a 10 minute warm-up for the mercury vapor bulb. Because of the intensity of the light, it is recommended that you open the “light blocking tray” only when the unit is being used for burning screens. 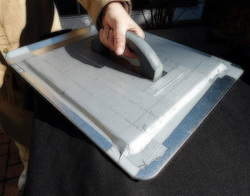 If you have built your own exposure unit, you have most likely discovered that holding a screen firmly against the glass and the film positive during the exposure process can be a problem. Each screen burning session often becomes a trial and error process that produces inconsistent results. What you need is a device that will work effectively each and every time you burn a screen. There is a simple solution to this problem. Read this tutorial... 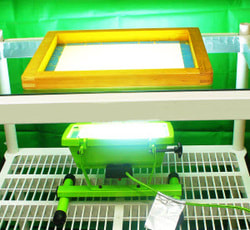 For plans on how to build an easy to use exposure unit that you can make at home using easy to source parts, check out the EZ Expose.
We designed it here at American Screen Printing Association and have used it to burn plenty of screens. The EZ Expose also works well as a light table for preparing art, checking for pinholes in stencils and a storage rack for screens. It's affordable, safe to use, and works like a champ. Check it out.
0 Comments
Your comment will be posted after it is approved.
Leave a Reply. |
AuthorASPA Staff ArchivesCategories
All
|
 RSS Feed