

 To be able to screen print photographic or grayscale images, an image must be converted into what is known as “halftones”. A halftone image consists of many small dots that make up the grayscale portion of that image. Screen printing halftones can present certain challenges and we’ll address them in this tutorial.  25 LPI halftone screen 25 LPI halftone screen HOW BIG A “DOT” SHOULD YOU USE? The size of the halftone dot used will of course be determined by the type of artwork that you are going to print or the printing technique that you will use. For example, screen printing on apparel typically involves printing halftones in a range of 35-65 LPI. There may be occasions where you want the halftone to be very noticeable and exaggerated for a special effects look, where you may want to go down to a 25 LPI size halftone which will produce a very noticeably large dot. 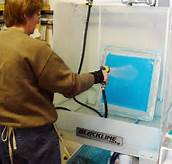 WASHING OUT HALFTONE SCREENS As was previously noted, care must be taken when washing out any screen that contains halftones. If your screen is exposed properly you should not experience any problems. Washing out a screen containing halftone dots should not be any more difficult than washing out any other type of screen. 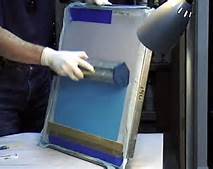 COATING YOUR SCREENS FOR HALFTONE PRINTING Use the sharp edge of the scoop coater for mesh counts of 162 and up. Most jobs involving fine detail and/or small halftone dots do not require a heavy ink deposit and you'll want to be able wash out the image on the screen easily. The sharp edge of the scoop coater deposits less emulsion on the screen resulting in a thin ink deposit on the printed product. For mesh counts of 162-305 and up put just one coat of the emulsion on the print side and one coat of emulsion on the inside using the sharp edge of the scoop coater. 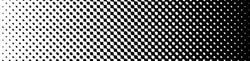 DOT SHAPE AND ANGLE The ideal halftone dot shape for screen printing on apparel is an elliptical dot. When outputting your film through Adobe Photoshop or similar programs choose an elliptical dot shape whenever possible. If that is not possible, make round halftone dots your second choice. Regarding the screen angles which refers to the alignment of the dots as they reference to each individual color in the print order, a good rule of thumb for simulated process printing is to use an angle of 56 degrees for the white underbase and 26 degrees for all other colors including black. The dot angle is another function that you can adjust when outputting through Adobe Photoshop. One of the main purposes of adjusting the dot angles is to minimize or eliminate a moire pattern. 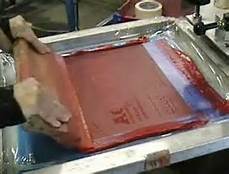 PRINTING HALFTONES This discussion is limited to manual screen printing only. The angle, pressure, and speed at which you pull the squeegee will effect how a halftone dot is printed on the substrate. Our recommendation is to use as little pressure as possible to clear the ink from the screen and to print at a regular and deliberate speed at a normal squeegee angle. You want to try to print “like you are a machine” with consistent, repeatable strokes of the same angle, pressure and speed. Automatic screen printing machines always produce a better result than a manual printer and your goal is to try to “emulate an automatic press” in your printing technique. Avoid flood stroking if possible and use as few strokes as possible with one stroke being ideal. Probably the most important element that will control manual halftone printing is the angle of the squeegee. The more the squeegee is angled downward (assuming equal pressure and speed in the stroke) the more ink that will be deposited and the darker the print will become. Printing halftone dots by hand to achieve good looking prints requires a certain amount of practice and experimentation. Further, it is recommended that the squeegees that you use for printing halftones have sharp blades that are free of nicks and other imperfections and are of medium, hard, or multi-durometer. Again, practice makes perfect. The more experience that you have, the better you will become at printing halftones.  DEALING WITH DOT GAIN As mentioned above, it is important that you limit the number of strokes, be mindful of your squeegee angle, and control ink buildup on the bottom of the screen once that starts to become a problem. Dot gain is simply the function of the halftone dot enlarging in size during the printing process. While it can not be eliminated completely, it can be controlled to some extent by using the proper printing techniques described and by periodic “wiping clean” the bottom of the screens during the print run.  If you are printing four color or simulated process color with a manual screen printing press it is recommended that you print from 45-55 LPI. If you have a high end automatic screen printing press along with a point light source exposure unit and are using professionally produced film positives you may want to consider printing 65 LPI. If you are new to halftone screen printing we suggest you experiment with various LPI sizes so you can see what the limitations of the equipment are in your particular shop.  MOIRÉ PATTERNS Moiré is the visual effect of radiating curves created by superimposing two regular patterns. For example, a moiré pattern can result from overlapping two halftone screens of different angles, dot spacing, dot size and the weave of the fabric. Moiré patterns are the undesirable result of rescreening an image with a different halftone screen or with the same halftone screen on an angle different from the original. Moiré patterns create a “herringbone” appearance and make the printed image visibly distracting. Eliminating moiré can be as simple as choosing a different brand of shirt or as complicated as outputting the art at different halftone angles and reburning the screens.  DRAWBACKS OF VELLUM VS. FILM FOR HALFTONES The ideal halftone dot on a film positive will be as dense a color black as possible and each succeeding color separation will line up in registration as perfectly as possible. Because of that you will find that ink jet positives or professional made film positives will produce a film positive that is vastly superior to using vellum paper. Vellum paper will shrink as it is going through the laser printing causing a slight registration error. And the toner deposited on vellum paper from a laser printer cannot produce a dot as dark as can be obtained from an inkjet printer onto ink jet film. As a result, we recommend that you print halftone and halftone color separations whenever possible using an ink jet printer. Be advised that to print halftone dots will require that you have a Postscript printer and/or a RIP processor for your ink jet output device. There are software utilities that can be used for creating halftone images that can be printed a regular inkjet or laser printer. 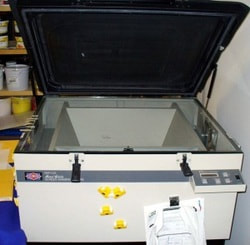 BURNING HALFTONE SCREENS High end exposure units that have a light integration system are the best possible light source for screen making, particularly for exposing screens that contain halftone dots. A light integrator is an electronic component in the exposure unit that detects and controls changes in light intensity. It will automatically adjust the light output to a consistent light level despite changes in electrical power line levels and for the light intensity changes due to the aging of the light bulb. With a light integrator, you will be assured of getting the same amount of light each time you expose a screen. When exposing images such as fine halftone dots, having a light integrator will improve the quality of your screens considerably. Without a light integrator, you will experience light scattering and the halftone dots will not resolve as sharply. If you are burning screens that contain large halftone dots (25-35 lpi), almost any light source will work provided you have a dense black film positive. When burning halftone screens it is important to expose them for the correct amount of time. Over exposure will result in a screen that is difficult or impossible to wash the dots out. An under exposed screen will result in the dots being “washed away” during the screen wash out process. Also be sure to blot out the screens with newsprint or newspaper after the wash out process so no clogging will occur during the screen drying process.
0 Comments
Your comment will be posted after it is approved.
Leave a Reply. |
AuthorASPA Staff ArchivesCategories
All
|
 RSS Feed