

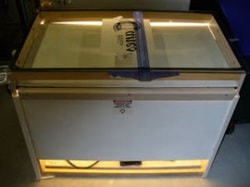
 Exposing a screen is one of the essential steps of the screen printing process. The phrase “burning” a screen has become a popular way to describe the exposure of an emulsion-coated screen to a light source, so throughout this article, you will see both terms being used to describe the same process. You can burn a screen from many light sources including the sun! The best light sources are those high in UV (ultra-violet) light. BASIC CONCEPTS Before we get started on the different methods to burning a screen, here's a recap summary of the screen making process: Artwork is printed onto a film positive. The “film positive” of the artwork (either inkjet film or vellum paper) is ideally completely opaque (pure black) and the rest of the film positive, of course, remains clear or translucent. The film positive is placed on the exposure unit glass (an exposure unit is the light-emitting device used to create a screen exposure) during the exposure process also known as "burning a screen." The screen is coated with a photographic chemical solution that is sensitive to light known as photo emulsion. When the light hits the screen, only the area darkened by the film positive "develops." The exposure process can take from just a few seconds to several minutes, depending on the type of exposure unit. Water is then applied to the screen during the "washout" process and only the portion of the screen that contains the image "washes out," thus creating the stencil. The stencil is the "open area" of the screen. When the screen has dried and is ready for printing, ink is placed in the screen and driven through the stencil with a "squeegee" thus creating a printed image. Now that we've gotten that out of the way, let's discuss the screen burning process in earnest. For our example, we going to use a “home-made” exposure unit—one that uses fluorescent bulbs as the light source. WARM-UP TIME No matter what type of exposure you use (except the sun, using the sun requires a different set-up technique), the basic procedure is the same. First step (if you're using an exposure unit with a constant light source) is turn the light source on and let the bulb reach it's normal operating output level. For most lights sources, a 10 minute warm-up time is sufficient. CLEAN THE GLASS Next step is to check to see if the exposure unit glass is clean. If it isn't, get out the glass cleaner and clean it. In fact, it's a good idea to keep a can or bottle of glass cleaner in your screen making area just for that purpose. You do not want any specks or dust on the glass as they will expose onto your screen and create pinholes. 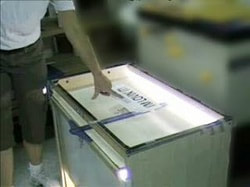 TAPE DOWN THE FILM POSITIVE Now, place your film positive on the center of the glass and tape it down. Be sure to use removable tape as any other kind of tape will make the removal of the film from the glass more difficult and can leave tape adhesive residue on the glass. 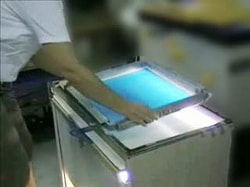 PLACE THE SCREEN ON THE EXPOSURE UNIT GLASS The next step to is place your emulsion coated screen on top of the glass to cover the film positive. Depending on what you are printing, and for the sake of this discussion, let's assume that you want the image to be positioned in the middle of the screen.  PLACE A HEAVY CLOTH OVER THE SCREEN Now, using a dark piece of cloth that is about 2/3 larger all around than the screen you are burning, cover the screen with the cloth.The next step requires that you do a little “arts & crafts” work beforehand, but is easy. Find a large size cardboard box of the heaviest gauge of cardboard that you can find. Cut out a piece of cardboard that fits inside the screen just loosely enough that you can move it around. Using this piece of cardboard, place it over top of the dark cloth snuggly inside the screen, push the cardboard down around the edges to make sure you have good contact with the screen. 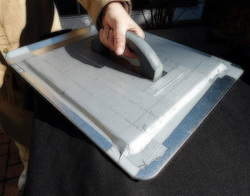 PLACE A "HOLD-DOWN" WEIGHT INSIDE THE SCREEN Finally, take a heavy object (a full gallon of ink works very well) and place it on the top of the cardboard. The idea here is to have the screen as close as possible to the film positive on the glass for a good, tight contact. The application of weight inside the screen accomplishes that. Most commercially made units use a vacuum pump and vacuum blanket system that draws the screen down tightly against the glass. You're now ready to burn a screen. TIP: For an even better solution for holding a screen firmly against the exposure glass, check out: "How to Build a Screen Hold-down for an Exposure Unit." EXPOSURE TIME Now, here is the slightly tricky part. Since you have never burned any screens with this exposure unit and may have never burned a screen at all, you really do not have an ideal exposure time established for your particular set-up. Not to worry. Take a look at the specifications sheet provided by the emulsion manufacturer. Typically, the manufacturer will include exposure times for various light sources. This will be a good starting point for you. The worst that can happen is that the screen will be underexposed (stencil will be less durable) or overexposed (stencil will be hard to wash out). A useful tool to purchase is an exposure calculator. This is essentially a pre-printed film positive that can aid you in determining the optimum exposure time for your particular set-up. They are inexpensive and available from most screen printing supply vendors. In this article, we'll use an exposure time of 5 minutes. This would not be uncommon with fluorescent lights and photo emulsion. Using a cooking timer, (either analog or digital) set a countdown for 5 minutes and let the light source begin exposing the image on the screen. 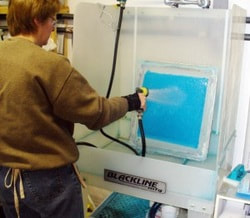 WASHING OUT THE SCREEN While you're waiting for the time to countdown, walk over to your washout sink and set the hot and cold faucets to a tepid temperature. You don't want to use cold water only (it will make washing out difficult) and you don't want the water to be hot or even too warm (this could cause the emulsion to wash right off the screen). Once your timer goes off, place the exposed screen into the washout unit and spray both sides generously with water. You should immediately start to see a faint image of your artwork appear on the screen. Leave the screen alone for about 20-30 seconds and spray with some more water. Your image should become more apparent. Within a minute and a half, you will start to see the emulsion “wash away” as you spray. Continue spraying until the stenciled area is completely white, or whatever is the color of your mesh, and your artwork is completely visible. Congratulations! You've just burned your first screen. 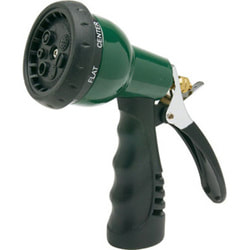 TIP: Here's a tip to help you with the screen making process. Buy a garden hose nozzle that has adjustable spray patterns (available in the garden center of any dept. store) to use in your washout sink. When you apply the initial water to your screen right after the exposure, use the gentle shower setting. When you reach the point where you are doing your final washout, select the flat setting. The flat setting sprays the water with more pressure and this will help you wash the remaining emulsion away more easily. The flat setting also works very well for washing out fine line art and images containing halftone dots. 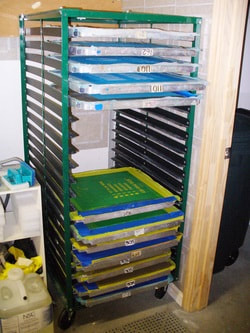 DRYING THE SCREEN The final step is to use newspaper and blot out all of the water from both sides of the screen. Place the screen on your drying rack and let it dry for at least several hours, ideally overnight.
0 Comments
Your comment will be posted after it is approved.
Leave a Reply. |
AuthorASPA Staff ArchivesCategories
All
|
 RSS Feed